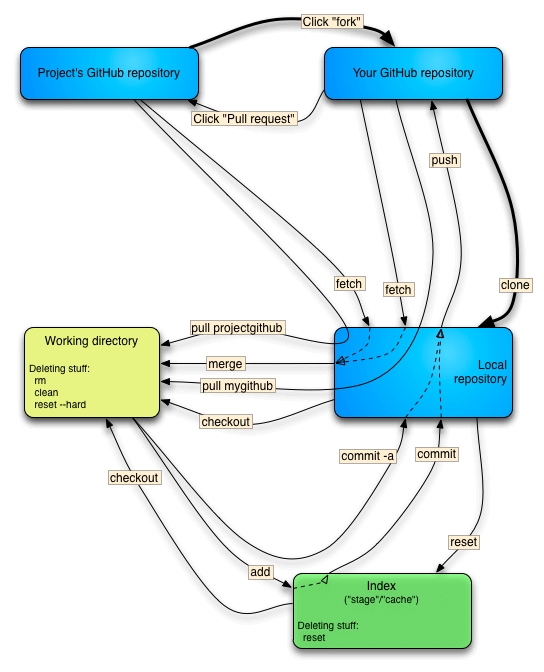
Collaborative Development Models
- The Fork + Pull Model lets anyone fork an existing repository and push changes to their personal fork without requiring access be granted to the source repository. The changes must then be pulled into the source repository by the project maintainer. This model reduces the amount of friction for new contributors and is popular with open source projects because it allows people to work independently without upfront coordination.
- The Shared Repository Model is more prevalent with small teams and organizations collaborating on private projects. Everyone is granted push access to a single shared repository and topic branches are used to isolate changes.
Pull requests are especially useful in the Fork + Pull Model because they provide a way to notify project maintainers about changes in your fork. However, they’re also useful in the Shared Repository Model where they’re used to initiate code review and general discussion about a set of changes before being merged into a mainline branch.
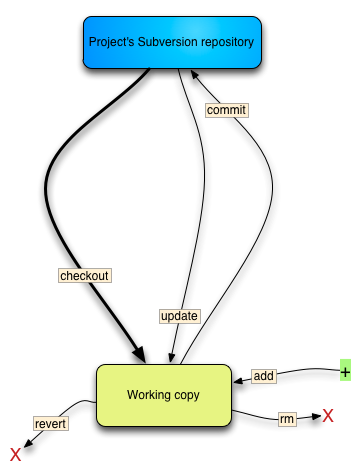
Comparison of Subversion and Git workflow
source: https://steveko.wordpress.com/[...]gs-i-hate-about-git/
1. Fork + Pull Model
- Create a fork of the repository. Go to the repository that you want to fork. This gives you a copy of the code from the point where you fork it.
- Clone your new fork. Now you may clone your new repository, to create a local copy.
- Work on the files locally. Edit the files, add new files, and so on. It is your repository.
- Commit changesets to your local repository as usual.
- Push your changes up to your fork. Push your changes to Bitbucket in the usual way. This will update your fork of the repository.
- Send a pull request to the owner of the original repository. Once you are satisfied with your changes, you can ask the owners of the original repository to pull in your changes and merge them into the main repository. Send a 'pull request'. The Issue tracker will send a notification to the owner, making it easy for you to communicate with them about your changes from this point onwards.
1.1. Step-by-Step Example – First the Fork
- Create a fork of the repository
- Clone your new repository (the fork), so that you can start working on it locally.
- Work on your files locally, as usual.
- Push your changes to your repository (the fork)
1.2. Step-by-Step Example – Now the Pull Request
2. Shared Repository Model
-
clonethe master repository twice- main
- sync
- main
- main:
pullchanges from the master repo
- main:
commityour your changesets to default tip or branch (5.0 | 4.3)
- sync:
pullchanges from the main repo - get the new commits you want to push
- sync:
pullchanges from the master repo - checks for new commits in the repo
- sync:
rebaseyour changesets to repohead if necessary
- sync:
pushyour new local commits to master repo head or branch
Do not force a commit (will cause a branch). Avoid the risk of causing multiple heads.
% hg push
pushing to https://github.com/WackoWiki/wackowiki
searching for changes
abort: push creates new remote heads!
(did you forget to merge? use push -f to force)
2.1. Step-by-Step
Use two clones. Do all your work in clone "main", and all your merging and pushing from clone "sync". Let's say the main repository is "master", and your two clones are "main" and "sync":
")
To get set up, either clone the master repository twice, or, you can clone your main locally, but be sure to update the "parent" reference in your sync clone such that it points to the master instead of your working clone (I do that by copying main/.hg/hgrc to sync/.hg/hgrc.)
Here's the workflow:
- As before, work in main. Edit files at will, and check in logical changesets as needed.
- When you want to
pusha changeset, go to your sync clone, andpullyour new changesets from your working clone:
 % cd ../sync
% hg pull ../main && hg update
At this point, it's best to try a build/test as well, to make sure changeset is complete. If you're working on many things in parallel, it's possible that your changeset is depending on a change in a file you haven't checked in yet.
- Now
pullin the new changes from the master, and merge these:
% hg fetch
hg pull && hg merge && hg ci -m "Merge").- If something went wrong with the merge - no problem. You can just go and nuke the entire sync clone and try again! Your modified files, and your new changesets, are still sitting completely unaffected in the main clone. Just
clonesync again and try more carefully :)
- Now you can
pushyour merged changesets to the master repository:
% hg push
- ...and now you can
pullthese changes back into your main repository:
% hg pull ../sync && hg update
This process may seem tricky, but it's trivial once you try it:
Finally, I want to call attention to item #4. Doing it this way means that it's trivial to try again if something wrong happens during the merge. I've had a couple of merges where I've really mucked things up. Unfortunately, this was in my tree that contained the changesets that I cared about. In the end I had to go and manually copy out the files I wanted to check in and try again. With the above approach, if something goes wrong, just nuke the sync clone and try again.
This is the reason I'm suggesting this approach to anyone using Mercurial, not just people who want to work with edited files. Especially when you're new to distributed version control systems or Mercurial, it's great to be able to go back if you make a mistake. Just make sure you know what you're doing before you submit that final hg push command to push everything back to the master repository!
3. Keep the history clean
Simplify your history, in the most intuitive and clutter-free way to combine commits from multiple developers in a shared branch.
")
3.1. Rebase
Workflow using the Rebase Extension.
Suppose you have a history like this: hg log -G
@  changeset:   2:81b92083cb1d
|  tag:         tip
|  summary:     my new feature: edit file a
|
o  changeset:   1:8bdc4508ac7b
|  summary:     my new feature: add file b
|
o  changeset:   0:d554afd54164
   summary:     initial
This means, revision 0 is the base on which you started to work on your feature. Now you want to have revisions 1-2 on a named branch, let's say my-feature. Update to revision 0 and create that branch:
$ hg up 0
$ hg branch my-feature
$ hg ci -m "start new branch my-feature"
The history now looks like this:
@  changeset:   3:b5939750b911
|  branch:      my-feature
|  tag:         tip
|  parent:      0:d554afd54164
|  summary:     start new branch my-feature
|
| o  changeset:   2:81b92083cb1d
| |  summary:     my new feature: edit file a
| |
| o  changeset:   1:8bdc4508ac7b
|/   summary:     my new feature: add file b
|
o  changeset:   0:d554afd54164
   summary:     initial
Use the rebase command to move revisions 1-2 onto revision 3:
$ hg rebase -s 1 -d 3
This results in the following graph:
@  changeset:   3:88a90f9bbde7
|  branch:      my-feature
|  tag:         tip
|  summary:     my new feature: edit file a
|
o  changeset:   2:38f5adf2cf4b
|  branch:      my-feature
|  summary:     my new feature: add file b
|
o  changeset:   1:b5939750b911
|  branch:      my-feature
|  summary:     start new branch my-feature
|
o  changeset:   0:d554afd54164
   summary:     initial
That's it .. moving around already pushed changesets generally is a bad idea, unless you work in a small team where you are able to communicate and enforce your history manipulation.
3.2. Mercurial Queues
Workflow using the MqExtension. Let's say the changesets to move are revisions 1-3:
hg qimport -r 1:3    # convert revisions to patches
hg qpop -a           # remove all them from history
hg branch new        # start a new branch
hg qpush -a          # push them all back into history
hg qfin -a           # finalize the patches
Mq can only convert consecutive changesets from a head. It turns normally immutable changesets into mutable patches that can be edited.
Don't edit changesets that have been pushed. Mq changes the hashes so they will be effectively new changesets. Only edit history that hasn't been pushed.
Suppose you have a history like this: hg log -G
#default branch
@  changeset:   3:cb292fcdbde1
|
o  changeset:   2:e746dceba503
|
o  changeset:   1:2d50c7ab6b8f
|
o  changeset:   0:c22be856358b
and we want
  @  changeset:   3:0e85ae268e35
  |  branch:      feature/my_feature
  |
  o  changeset:   2:1450cb9ec349
  |  branch:      feature/my_feature
  |
  o  changeset:   1:7b9836f25f28
  |  branch:      feature/my_feature
  |
 /
|
o  changeset:   0:c22be856358b
hg export -o feature.diff 1 2 3
hg update 0
hg branch feature/my_feature
hg import feature.diff
Here is the state of your local repository
@  changeset:   6:0e85ae268e35
|  branch:      feature/my_feature
|
o  changeset:   5:1450cb9ec349
|  branch:      feature/my_feature
|
o  changeset:   4:7b9836f25f28
|  branch:      feature/my_feature
|
| o  changeset:   3:cb292fcdbde1
| |
| o  changeset:   2:e746dceba503
| |
| o  changeset:   1:2d50c7ab6b8f
|/
|
o  changeset:   0:c22be856358b
Now you need to delete the revisions 1 2 and 3 from your default branch. You can do this with strip command from mq's extension. hg strip removes the changeset and all its descendants from the repository.
And now strip this repository on revision 1.
hg strip 1
now we got
@  changeset:   3:0e85ae268e35
|  branch:      feature/my_feature
|
o  changeset:   2:1450cb9ec349
|  branch:      feature/my_feature
|
o  changeset:   1:7b9836f25f28
|  branch:      feature/my_feature
|
o  changeset:   0:c22be856358b
note: changesets are different but revisions are the same
3.3. Conclusion
When multiple developers work on a shared branch, pull & rebase your outgoing commits to keep history cleaner
4. Links
- Don’t “Push” Your Pull Requests
- https://www.mercurial-scm.org/guide
- https://www.mercurial-scm.org/wiki/WorkingPractices
- Work in main, push and merge in sync, and pull back into main.
- A Guide to Branching in Mercurial
- https://www.mercurial-scm.org/wiki/NamedBranches
-
hg push -r branchname-to-pushOnly push branches you want to push. If you want a disposable branch, just don't push it and then strip it once you decide you don't want it anymore.
-
Files
| subversionarrows1.png | “Bread and butter” commands and concepts needed to work with a remote Subversion repository. | 37.3 KiB | 12/26/2013 13:43 |